If you have any further questions, contact us at HelpMe@MBAResearch.org and let us know.
Canvas is a learning management system that helps teachers obtain and deliver content to students. The MBA Research Learning Center is delivered via Canvas. It includes comprehensive tools to run your classroom. It includes grading, assessment, assignments, discussions, calendars, and many other features that allow you to manage instruction all in one place.
To get an overview of Canvas, watch these videos:
Or visit Canvas’ website to learn more about the system’s capabilities: Canvas LMS
What browser should I use with the Learning Center?
Canvas is built using web standards, so it can run on Windows, Mac, Linux, iOS, Android, or any other device with a modern web browser.
We recommend using Chrome or Firefox for the best experience with the Learning Center.
If you prefer to use another web browser, please choose from the list of Canvas-supported browsers.
You should always use the most current version of your preferred browser. Your browser will notify you if there is a new version available.
How do I set up my Learning Center account?
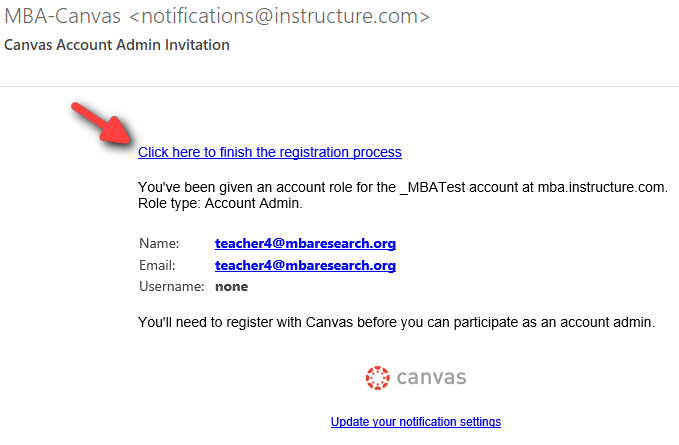
Are you new to the MBA Research Learning Center? Setting up your account is easy! After you purchase a subscription to the Learning Center, you will receive an email similar to the screenshot below. The email will guide you through the process of signing up and creating a password.
Click on the link in your email to finish the registration process. Create a password (must be at least 8 characters and may include letters, numbers, and/or special characters), and set your time zone.
If you don’t receive the email from Canvas, check your spam folder. If you still don’t see it, contact us at HelpMe@MBAResearch.org and let us know.
How do I create a course in the Learning Center?
Are you ready to set up your first course in the Learning Center? It’s easy to customize courses to your liking with our ready-to-use modules! All it takes is a few quick steps.
Step 1: Create a Course
Step 2: Enroll Yourself
Step 3: Add Content (LAPs, Course Guides, etc.) to the Course
For full instructions with screenshots, see the Learning Center Guide and click the “Creating a Course” link.
How do I add students to a course?
You may only add students if you have purchased student licenses. If you add students without first purchasing student licenses, you will be billed a violation charge for these student accounts. Please help us control costs and pricing: use only what you’ve licensed. If you wish to purchase student licenses, visit our online store: The MBA Shop. Note: Kentucky educators have an upgraded membership that includes student licenses (no additional purchase needed). If you are in the High School of Business™ program, student licenses are already included in your Learning Center subscription.
Once your course is ready to go, it’s time to add students to it! In your course, click the People link in the course navigation menu on the left side of the screen. Click the + People button. Add your students by email address. You may manually type the email addresses or copy/paste them from a spreadsheet (separate the emails using a comma or line break). Then select the role of Student. Click the Next button and follow the instructions on the screen to select students and enter student names if desired. Then click the Add Users button to add the selected students to the course. The system will then email each student a link for them to accept the course invitation and create a password for their account. In the People section of your course, you will see “pending” next to the name of students that have not yet accepted the course invitation.
Note:
View the Learning Center Guide or watch this video to see the process.
View the Canvas Guide Instructions (with images)
Watch this Canvas Video Tutorial for an overview of the People section of your course and learn how to access student information.
Related Topics:
How do I create course sections?
Creating course sections allows you to divide your course into sections and separate students. Through this feature, you can easily differentiate instruction by giving different assignments to different students.
To add Sections: Open your course, go to Settings, and click the Sections tab. In the section name field, type the name of a new section, then click the + Section (Add Section) button. Optional: click on the section name and click Edit Section to change any details (name, start/end dates, etc.) about the Section.
Add Students to Sections: Click on People from the course menu, and then the Options icon (3 dot menu) to the right of a student’s name. Click Edit Sections and enter the section name, or click Browse and select the section. Then click Update. Note: Canvas will show you the section(s) where the user is already enrolled. Users can be in more than one section. You do not need to remove the original section.
Learn more from the Canvas Guide:
How do I add a section to a course as an instructor?
How do I edit sections for enrollment in a course?
How do I assign an assignment to a course section?
How do I move courses over from previous enrollment terms?
In the Learning Center, enrollment terms end on June 30. Courses that were created using a previous term will no longer appear on your Dashboard. However, you can copy old courses into the current enrollment term. Courses should be copied when you want to use or repurpose previously created content including course settings, syllabus, assignments, modules, files, pages, discussions, quizzes, and question banks. Not all content can be copied as part of a course.
Instructions: Open your old course and go to Settings. From the right sidebar menu, click Copy this Course. You may change the course name, code, and start and end dates. Be sure to change the Term (select the school year you will teach the course). Choose content to import, adjust the events and due dates to your liking, and click the Create Course button. When you copy a Canvas course using the Copy this Course button, you will be added to the course as an instructor automatically.
Tip: To find your old courses, click the Courses link, then All Courses; or click the Admin link > select your school > Courses.
Note: To use a course beyond the term dates, you should update the course start and/or end date in the course Settings. See instructions here.
Learn more from the Canvas Guide
Related topic: How do I import a course into the Learning Center?
How do I add assignments to the Learning Center?
After you have your courses set up and your students are ready to learn, it’s easy to add and customize your assignments! You can upload documents, or you can create them within Canvas itself. This video will walk you through the process. Written instructions can be found here.
For a brief overview of what you can do with assignments, check out this Canvas video tutorial.
If you are using the Learning Center with students, you have to publish your course so that students can view it. Otherwise, only you (the teacher) will be able to access it. You can publish your course in the Course Home Page sidebar or on the Dashboard.
Publish in Dashboard: If you are not currently viewing the Dashboard, click the Dashboard link. Locate the Unpublished Courses section in the Dashboard. Find the course you want to publish and click the Publish button.
Tip: If there are no courses on your Dashboard, then you are not currently enrolled as a teacher in any active courses. Click here for instructions to create a course and enroll yourself as a teacher.
Publish in Course: Open the course you want to publish. In the Sidebar, click the Publish button. A message will appear at the top of your screen confirming the publishing of your course.
Tip: On smaller screens, the sidebar displays beneath Course Home Page content.
If you need to unpublish your course, click the Unpublish button in the sidebar. Once your course is unpublished, students who already received course invitations will not be able to access your course.
Notes:
View the Canvas Guide Instructions (with images)
How do I use the Gradebook in the Learning Center?
After your students have completed assignments and assessments, you might be ready to use the Gradebook. The Canvas Gradebook can be imported or exported into other systems. To learn how to use the Gradebook, watch this Canvas video tutorial. Written instructions can be found here.
Want to export the grades from your Learning Center Gradebook into a different system? Here’s how.
The Learning Center also has a great feature called SpeedGrader, which allows you to quickly and interactively view, grade, and comment on assignment submissions. SpeedGrader also allows you to make corrections and annotations and use a rubric to automatically grade in seconds. Watch this Canvas video tutorial to learn how to use SpeedGrader. Written instructions can be found here.
How do I create my own quiz questions?
While the Learning Center includes a wide variety of ready-to-use assessments, you also can create your own.
First, you need to create a quiz: open your course and select “Quizzes”, then “+Quiz”. In the “Details” tab, name your quiz, add any instructions, and fill in the rest of the quiz details.
To add an individual question: click the “Questions” tab, then click the “+New Question” button. Then, add a question title (or number) and select the question type from the drop-down menu. Canvas allows for many types of questions, including multiple-choice, true or false, and fill-in-the-blank.
After selecting a question type, assign a point value to the question. In the text box, enter your question text, add images and videos, or any other relevant content. Then, add possible answers in the fields provided. To add content other than text in the answer fields, click the edit icon to view the Rich Content Editor, enter content in the text box, and click “Done”. Correct answers are indicated by green outlines, while incorrect answers are red. The correct answer is identified by a solid green arrow next to the answer. The answer’s feedback bubble is also green. Next, click the “Update Question” button to save the question.
Once you have added all your quiz questions, click the “Save & Publish” button to save the quiz and make it available to students. Otherwise, click the “Save” button to save the quiz in the draft state, which will not be available to students.
Watch Canvas Video Tutorial
Learn more from the Canvas Guide
How do I move content from the Learning Center to another Learning Management System (LMS)?
Prior permission (special licensing agreement) is required to use our copyrighted modules in another platform or LMS. You will need to sign and return the Licensing Agreement before using our content in another LMS. Contact us for details.
Does your school use a platform or system other than the Learning Center for classroom management? If so, don’t worry! It’s easy to migrate the Learning Center contents to another Learning Management System (LMS). You can download courses and/or LAPs from the Learning Center and upload them to another system.
If you use one of these systems, click the link to see specific instructions for moving content to that system: Canvas | Google Classroom
Can your system accept an IMSCC or ZIP file? If so, you will first need to download the content from the Learning Center, then upload the content into your desired LMS. Here are the basic steps (click the links for detailed instructions):
Even if your system cannot accept IMSCC or ZIP files, you can still use our content in your LMS. But first, you need to create a course in the Learning Center and add LAPs to the course. Then download individual items for use in your LMS. The downloadable items of a LAP are located under the “Downloadable” section and the “Instructor Section” of the LAP. Click here for more details about accessing downloadable items.
Watch this video to learn how to move files from the Learning Center to either Google Classroom or Schoology.
View screenshot instructions for Canvas, Schoology, and Google Classroom: Downloading an Entire Course (pdf)
Related Topic:
How do students collaborate using the Learning Center?
One of the best features of the Learning Center is the technology that allows students to collaborate digitally! There are so many ways for students to do so, including:
This Canvas video tutorial explains how teachers can use the Collaborations feature and allow students to work simultaneously on a document using Google Docs.
Here are some more resources focused on collaboration in Canvas:
How do I use the Collaborations Index Page in Canvas?
How do I create a Google Docs collaboration as an instructor?
How do I add a preloaded course to my Learning Center course?
The Learning Center offers preloaded, ready-to-use courses that align with each of our course guides.
Types of preloaded courses:
To use a preloaded course: click the Commons link, then click Filter and select Courses. The results will show all of the available preloaded courses. Look for the courses that have “MBA Research” as the author. You can search the results by typing a subject or keyword in the search bar. Once you have located a course to use, click the blue link course title to preview and import it. Click the Import/Download button and select your course. Then click Import into Course. It may take a few minutes for the entire course to load into your course. After the import is done, to view the content in your course, click the Courses link on the main navigation menu and select your course. You can then rearrange, add, or remove content to suit your needs.
Note: Preloaded courses may not be available for all subjects.
How do I build a quiz using the Question Banks?
Open the appropriate course and click the “Quizzes” link. Click the “+ Quiz” button in the right corner. Name your quiz, and type in any instructions. Then, click on the “Questions” tab. Click the “Find Questions” button. This will bring you to the Question Banks.
The banks are organized alphabetically by performance indicators. You can select some questions from a performance indicator, or you can select all of the questions for a particular performance indicator by choosing “Select All” at the top. You can also select questions from different performance indicators for the same quiz.
You can also create a question group. Question groups randomly generate a certain number of questions from the group each time the quiz is taken. For example, you can add all of the Economics performance indicators to the group and instruct the system to select 10 questions from the group. That way, the quiz will give 10 different questions to each student each time it is taken.
To create a question group, scroll down to the bottom of the “Find Quiz Question” window and select “New group”. Name your group, choose questions, and assign a point value per question; then click “Create Group”. Make sure the group is selected in the drop-down menu before clicking “Add Questions”. Once you have selected all of the items you want, click “Add Questions”.
When you’re finished, continue adding the other information about the quiz, such as the due date and time limit. Scroll to the bottom and select “Save” to save your quiz in draft state, or “Save & Publish” to allow your students to access the quiz.
Learn more from the Canvas Guide
Watch Canvas Video Tutorial
See also How to Create a Course Question Bank Using Existing Quizzes in a Course (PDF)
How do I administer an Instructional Area exam?
Instructional Area exams can be found in the Commons. Search “exam” and all of the exams will be displayed. You can also search for a particular exam, such as “marketing exam.” Select the exam you want and import it into the appropriate course. If you’d like, you can create a new course just for the exam. When the import is finished, the exam will be located under “Modules” in your course. It can also be found under “Quizzes.”
If you created a new course for the exam, be sure to publish the course so that your students can view the exam.
To change the availability and other aspects of the exam, open the exam from the course home page. Then, click the “Edit” button in the top right corner of the page. From here, you can change the due dates, the allotted time, and other details.
To see how students have performed on the exam, open the exam; then, click on the settings button in the top right corner of the screen. Select “Show Student Quiz Results.”
How do I make instructor files available to students?
Some of the files in a LAP module are sorted under the “Instructor Section”, which means that students cannot see or access them. If you would like to make a file available for students, click on the Options icon next to that activity. Then, click “Move to…” Select the appropriate module, and then decide where in the module you want it to go (before or after another section). Click “Move.” For example, you can move Group Activity 2 so it is right before the Posttest. Then, find the file in its new location and click on the publish icon to change the file from Unpublished to Published. Now, students will be able to access the file from their accounts.
How do I use the Calendar in Canvas?
Canvas has a calendar feature that users can use to keep track of everything they need to do for all of their courses. You can view the calendar by day, week, month, or agenda. Color coding is used to differentiate personal, course, and group calendars. Access the Calendar from the Global Navigation menu in Canvas.
This tutorial from Canvas goes into more detail about the calendar function: How do I use the Calendar as an instructor?
How do I utilize the Canvas Community?
The Canvas Community is a comprehensive resource to help you make the most use of the system. It includes guides, resources, answers to questions, discussion groups, and idea sharing. You can access the Canvas Community here: https://community.canvaslms.com/
How do I access PowerPoint presentations in the Learning Center?
Each LAP module contains a PowerPoint presentation.
To access the PowerPoint for individual LAPS: open your course, click on Modules, find the LAP module of interest, and then scroll to the section of the module labeled Instructor Section. Under that section, you will see the PowerPoint presentation. Click on the item link to open it in the Learning Center. You can scroll through the slides in the Learning Center, or you can download the file to your computer by clicking the Download link at the top of the screen.
Learning Center Course Guides (preloaded courses): The PowerPoint presentation can be accessed from the Modules section of the course and under the Instructor Guide (or Instructor Section) header of each unit module. It can also be accessed from the unit pages under the Resources section.
High School of Business™ courses: The PowerPoint presentation can be accessed from the Modules section of the course and under the Instructor Resources header of each unit or project module. It can also be accessed from the unit pages under the Resources section.
Note: When you import content into your Learning Center course, all downloadable files (including the PowerPoint presentation) are stored under the Files section of the course and can be previewed or downloaded from there. More about using the Files section here.
How do I access student information?
As a Canvas administrator, you can access student information. Click on the “Admin” link, then select your school account. Click on “People” to view all of the users under your account. Select a student to pull up that student’s profile. The profile will show the student’s name, picture, email, time zone, enrollments, and page views. If you have Outcomes enabled in your account, you can view each student’s progress on these from this page. To do so, click “See Outcome Results for [STUDENT NAME].”
How do I add my own content to a course?
You can customize your courses in the Learning Center by uploading your files. From the Course menu, select “Files.” Then, click on the “Upload” button in the top right corner. Select the file you want to upload and click “Open.” When the upload is complete, your file will be added to your course.
For a detailed tutorial of this process, click here.
How do I add point values to assignments in the Learning Center?
Some assignments in the Learning Center have a default point value. You can edit or add point values to any assignment.
For an Assignment: In the course navigation menu, click the Assignments link. Locate the assignment and click the assignment’s options icon (3 dots to the right of the name). Click Edit and add a point value for the assignment in the Points field. To change how the grade is displayed in the Gradebook, click the More Options button and choose an option in the Display Grade as drop-down menu. Then click Save.
For a Quiz: In the course navigation, click the Quizzes link. Open the quiz and click Edit. In the Details tab, select Graded Quiz from the Quiz Type drop-down menu. Then, click the Questions tab. Edit each question by clicking on the pencil icon to the right of the question text (hover the mouse over the question text to reveal the pencil icon). Add a point value for the question in the pts field and click the Update Question button at the bottom of the question box to save changes. Once you have updated all questions, scroll to the bottom of the page and click Save to save all changes to the quiz.
For a Discussion: In the course navigation menu, click the Discussions link. Open the discussion and click Edit. Under the Options section, click the Graded checkbox. Add point value in the Points Possible field and choose how you want to display the grade in the Display Grade as drop-down menu. Then click Save.
See the Canvas Guide Instructions (with images):
How do I export a course from the Learning Center?
You can export courses from the Learning Center to use on other platforms or save a copy to your computer. When Canvas exports a course, the format is an IMSCC ZIP file (Common Cartridge).
To export a course, open the course, then click “Settings.” Click “Export Course Content.” Select “Course” as the export type, and then click “Create Export.” When the export is finished, click the “New Export” link to download and save the file to your computer.
To see these instructions with pictures, click the link: How do I export a Canvas course?
How do I import a course into the Learning Center?
You can import your content or courses from another Learning Management System (LMS) into your Learning Center course.
How to do it: Log in to the Learning Center and open your course. Click the Settings link. Click Import Course Content and choose your Content Type. Choose the source file. Then select All content to import all the content from the course or click Select specific content if you want to import select items from the course.
The Current Jobs section displays the status of your import. If you chose to select specific content in your course, the current job will show as “Waiting for select” which means you must select the content you want to import.
Note: When importing a Canvas course, the package will overwrite some of the existing course settings. Please review the course setting after any course import to make sure important settings are still in place. If you import the same content (for example the same course file imported into your course more than once), then the existing content in your course will be overwritten by the content in the import file.
For full tutorials on importing the various content types, see the topic Course Import Tool.
Related topics:
How do I use Canvas on my mobile device?
Both teachers and students can use the Learning Center on mobile devices. While you can use a mobile web browser to access the Learning Center on mobile devices, we recommend using the Canvas mobile app. The available apps include:
Download the Canvas app: search in your device’s app store for the app name (see list above). Download/Install the app.
Log into your Learning Center account: Open the app, tap the Find my school button and type mba.instructure.com in the text field, and tap Next or enter on your keyboard. Then enter your Learning Center username (email address) and password, then tap Log In. You will then see your Dashboard.
Teachers: If your Dashboard is empty, it is because you do not have any courses marked as favorites. If this is the case, click “Add Courses/Groups” to select courses to view on the Dashboard. Learn more about using the Dashboard on the mobile app here.
Students: Must be enrolled in a course to see the course on the app Dashboard.
To learn more about Canvas mobile apps, check out these links: Canvas Mobile Guides | Canvas Mobile Users Group
How do I renew my Learning Center subscription?
Your MBA Research Learning Center subscription is good for one year. When that year has passed, unless you renew, you will lose access to your account. However, all of your records and data will be saved for a short while should you decide to resume your subscription. A reminder email will be sent to notify you when it is time to renew. If you do not renew your subscription within the time frame given, your account will be deleted, and all your data will be permanently removed from the system.
Teacher Access: To renew your subscription, please order online at The MBA Shop. If you have any questions or need assistance placing an order, call 614-486-6708 or email service@mbaresearch.org.
Student Access: You (or your school/district) must purchase student licenses separately before setting up student accounts in the Learning Center. Student licenses are priced on a per-student basis, with one user license per student. Student licenses are effective for the school year in which they are purchased and expires on June 30 of the school year. You may purchase student licenses online at The MBA Shop.
Enhanced Members: If you are an educator in an Enhanced Level Member State, good news – your state has already paid for your teacher access to the Learning Center. However, if you want students to access the Learning Center, you will need to purchase student access separately (review Student Access information above). Send an email to helpme@mbaresearch.org to let us know you want to continue using the Learning Center in the new school year. Include the following in the email:
High School of Business™ Sites: Your teacher and student licenses are covered in your school’s annual affiliation fee. In addition, your subscription is automatically renewed.
How do I see what my students see in the Learning Center?
You can view a course the same way that your students view your course through Student View. To see the student’s perspective, use Student View to view the course, post, and reply to discussions, submit assignments, view grades, view people, view pages, view the syllabus, view quizzes, view the calendar, and more. You will see only what you, as the instructor, allow your students to see.
To activate Student View, open your course. On the course home page, click the Student View button (it appears at the top of the page). You will know if you are in Student View because you will see a pink frame around your screen and a persistent box on the bottom of the screen indicating you are logged into Student View.
Tip: You can also activate Student View on other course navigation pages, such as Modules, Assignments, Quizzes, People, Pages, etc. Look for the button/eyeglass icon at the top of the page.
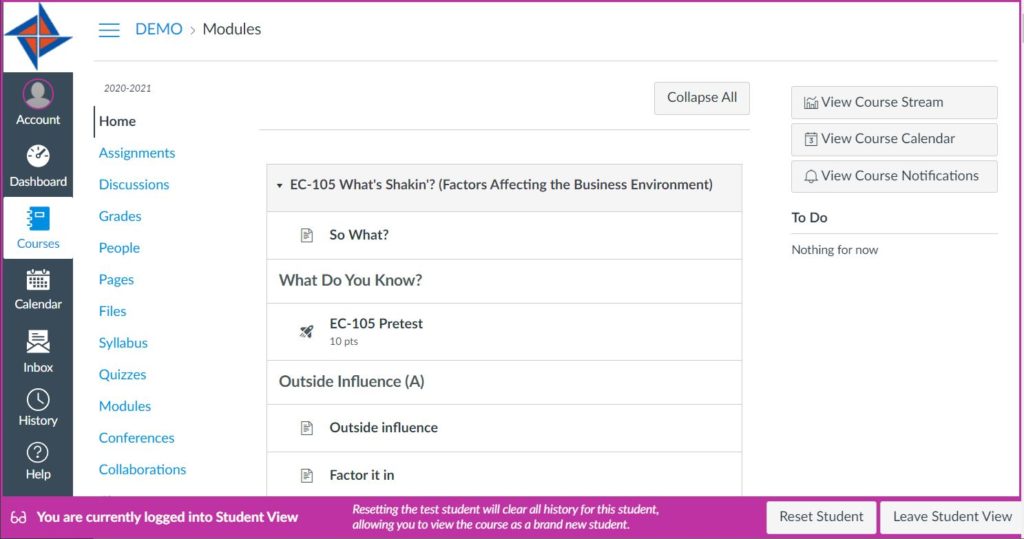
Enabling Student View creates a Test Student in your course and Gradebook. You can reset the Test Student by clicking the Reset Student button. This action will clear all activity that does not include any student interaction. To exit Student View and return to your course in the instructor view, click the Leave Student View button.
View the Canvas Guide Instructions (with images)
Related Topic: How do I publish or unpublish a LAP module?
Open your course and click on “Outcomes.” In the right corner, click on “Manage Rubrics”. You will then see a list of all rubrics associated with your course. To create a new one, select the “+Add Rubric” button in the top right corner. Title your rubric. Then, add criteria, ratings, and points. You can use Outcomes if you have them set up. When you are finished, click “Create Rubric”.
This tutorial from Canvas walks you through the process in detail, complete with images: How do I add a rubric in a course?
How do I add a rubric to an assignment?
You can attach an existing rubric to an assignment. From your course menu, click on “Assignments.” Select an assignment, and then click on the “+ Rubric” button in the bottom left corner. You’ll have the option to create a new rubric, or you can click “Find a Rubric” on the right side of the screen. A list of existing rubrics will appear. Scroll through to find the rubric you want to use for this assignment, and then click “Use this Rubric”. You can edit it as needed by clicking the Edit pencil icon in the right top corner of the rubric.
Rubrics may also be added to graded discussions and quizzes. Learn more here:
How do I add a rubric to a graded discussion?
How do I add a rubric to a quiz?
How do I add images and/or videos to a course?
It’s simple to add an image or video to pages in the Learning Center. Images can be uploaded from your computer or added from other websites. Videos can be embedded from services like YouTube and Vimeo.
From your course menu, click the “Pages” link. Open a page and select the “Edit” button in the right corner. For an image, click on the image icon and then choose the image you want to upload. You can use a URL, an image already in Canvas, or an image from Flickr. If you want to add a video, select the video icon from the text editor toolbar. You will need to add a source such as a link, or you can use an embed code from a video to embed the video within the text. Make sure to save the page when you are finished.
In the Learning Center, you can require your students to review each other’s work. To do so, select an existing assignment or discussion. Then, click “Edit” and scroll down until you see “Peer Reviews” and check the box that says, “Require Peer Reviews”. You can then decide whether to manually assign peer reviews or automatically assign peer reviews. If you choose the automatic version, you will need to select how many reviews are completed by each user and when the reviews should be assigned. You can also have the reviews appear anonymously if you prefer. Choose to whom you want to assign this activity, and make sure to save by clicking the button in the bottom right corner.
Can the Learning Center be used with a screen reader?
Yes, the Learning Center can be used with a screen reader. Canvas was built to be accessible to all users. It works with the following screen reader and browser combinations:
Note: Canvas is designed so that screen reader users can confidently utilize their preferred screen reader and browser. However, the variety of browser and screen reader combinations means that all combinations are not tested and may not work well in Canvas. If you experience issues using your preferred browser and screen reader combination, please review and utilize the officially supported combinations listed above. If you experience issues with the officially supported screen reader and browser combinations, please report your experience to Canvas Support.
When using a screen reader, you can get around Canvas by using the headings, which have been marked to be recognized by screen readers. The Canvas page navigation menu is:
You can also move components of a course using a screen reader. The Move-to option is available for the following features:
More information about the available accessibility features can be found here: Accessibility within Canvas
How do I resend student invitations to a course?
If you’ve invited students to a course, and they have not yet accepted the invitation, you can resend the invitation after 24 hours. Remember that students will not be sent a course invitation until the course start date and that you must publish your course before students can receive invitations.
To resend invitations, open the “People” link in your course. You will see a message that indicates how many invitations have not been accepted. You will also see pending enrollments, which are indicated in blue under the students’ names. To resend a specific person’s invitation, click the Options icon (three dots to the right of the person’s name), and then click “Resend Invitation”. You can also resend all pending invitations at once using the “Resend” link above the list of names.
For instructions with screenshots, click here.
How do I view student results within a quiz?
From the course menu, select “Quizzes.” Click on the name of the quiz, and then click on the Options icon (three dots on the right side). Click “Show Student Quiz Results.” You’ll then see a list of students who have taken the quiz and a list of students who have not taken the quiz. Select the name of a student who has taken the quiz. On the right side, you will see a list of Quiz Submissions, if students are allowed multiple attempts. The Learning Center displays the most recent attempt by default. To view past results, click the Attempt under the Quiz Submissions heading.
For instructions with screenshots, click here.
How do I remove students from a course?
Open your course and select the “People” link. You can search for students by typing their names in the search field. When you find the correct student, click on the Options icon (three dots to the right of the name). Then select “Remove from Course”. You’ll be asked to confirm the deletion by selecting “OK”.
NOTE: If the student already has grades/assignment submissions for a course, removing the student from the course will permanently delete those grades/submissions. If you need to retain the student’s grades/submissions but restrict the student from accessing the course, then it would be best to deactivate (not remove) the student. See: How do I deactivate an enrollment in a course?
You can find instructions with screenshots here: How do I remove an enrollment from a course?
TIP: Keep in mind that removing students from your courses does not delete them from the Learning Center system—which means that you could potentially be charged in the future for those accounts. If you need to permanently remove a student from the Learning Center, contact MBA Research to permanently delete the student account from the system for you. Please email us and include a list of students’ Canvas usernames to be removed (the username is the email address that they use to log in to the Learning Center).
Locking a quiz keeps students from taking it. From the course menu, select “Quizzes”. Click on the name of the quiz, and then click on the Options icon (three dots on the right side). Select “Lock this Quiz Now.” When you go back to the Quizzes screen, you will see that the quiz now has the word “Closed” under it.
To unlock the quiz, click on the name of the quiz, and then click on the Options icon (three dots on the right side). Select “Let Students Take this Quiz Now”. You can then set a time limit on how long you would like to unlock the quiz. You can choose “No time limit” or select a date and time. Then click “Unlock” and your quiz will be made available to students.
Alternatively, you can schedule when to lock/unlock a quiz using the Availability date. See topic: How to set Availability dates for an assignment or quiz?
How do I search for LAPs in the Learning Center to add to my course?
LAPs and other content are stored in the Commons. From the left navigation menu, click the Commons link.
In Commons, use the Search bar and Filter button to find specific content:
To add the LAP (or resource) to your Learning Center course:
For instructions with screenshots see the Learning Center Guide: Creating a Course: Step 4 – Add LAPs to Your Course
Not sure which LAPs to use? You can choose a preloaded course. These courses contain all the LAPs that MBA Research recommends for teaching a particular subject.
Related Topics:
How do I find additional online and textbook resources in the Learning Center?
Did you know that each LAP module in the Learning Center contains several vetted, high-quality resources related to the LAP topic? These are great for extending your instruction and engaging your students in a variety of ways. To access these resources, open a course and select a LAP. Scroll to the “Explore the Web” section and find online resources.
To find book sources, scroll down to the “Instructor Section” and select “On the Bookshelf.” Here you will find textbook references, complete with page numbers. You can also publish this if you would like your students to access them by clicking the publish icon on the right-hand side.
How can I help students remember their login information?
We all sometimes forget our usernames and passwords! Your students might struggle to remember how to get to the Learning Center. To help your students remember how to access their accounts, instruct them to save their information on their phones as a contact, bookmark, or note at the beginning of the semester. They can include the URL (mba.instructure.com) as well as their login information. You might want to try saving your information this way, too!
How to use the test banks to create unit/semester exams?
See related FAQ article: How Do I Build a Quiz Using the Question Banks?
How can I use the Learning Center to prepare for competitions?
The Learning Center offers tons of tools to help your students prepare for CTSO competitive events. Here are just a few:
To learn how to use the test item bank, click here.
To see a full list of LAP modules available in the Learning Center, click here.
To learn how to add a rubric to an activity, click here.
How do I edit the features and settings of a quiz?
Open the quiz or test that you want to edit. Select “Edit” in the right corner. Under the “Details” tab, you can set a variety of options in a quiz. You can change the name of the quiz or update the quiz instructions. You can also change the quiz type; whether you want the quiz to be graded or treated as a survey. Additionally, you can select whether you want to shuffle answers, set a time limit, or allow students to take the quiz multiple times.
Choose to either allow or disallow students to see their responses and/or correct answers. You can choose when students are allowed and not allowed to see the correct answers. Also, select whether or not students can see the entire quiz or just one question at a time. Be sure to save it when you are finished.
Learn more from the Canvas Guide
How can I set restrictions on a quiz?
You can set restrictions to protect a quiz so it can only be taken in specific situations. This can help you prevent cheating and academic dishonesty.
Open an existing quiz and select “Edit”. Under the “Details” tab, scroll down to the “Quiz Restrictions” section. You can restrict the quiz in two ways:
1. You can require students to enter an access code to take the quiz. Create a code, and then, your students will be required to enter it to take the quiz.
2. You can filter IP addresses and require students to take a quiz from specific computers on a network. To do so, enter the IP address(es) in question. Enter each IP address separated by commas.
Here are some instructions to find your IP address:
You can assign a quiz to an individual student, course sections, or the entire class. This is useful when you want to differentiate instruction or prevent cheating by administering multiple versions of an assessment.
Open a quiz and click “Edit”. Scroll down to the “Assign” section. By default, every student in your course will be assigned the quiz, so you will see “Everyone” in the “Assign to” field.
To assign the quiz to an individual student or course section, remove the current selection by clicking the remove icon next to “Everyone”. Then click on the “Assign to” field and make a new selection from the drop-down menu, either select an individual student or course section. Tip: You can add multiple student names in the same “Assign to” field. Next, change the due date and/or available date range.
Note: You need to have course sections set up to assign the course to different groups of students. Click here to see how to set up course sections.
If you want to create another set of due dates or available date ranges for a different course section or different student, you can do so by clicking on the “+ Add” button. Then another set of assignment details will appear. You can create as many assignment groups as necessary.
Did you know? You can assign an assignment in the same way.
Open an existing quiz, and click on “Edit”. Select the “Questions” tab. From here, you can edit the existing questions.
To edit a question: mouse over the right side of the question, and then click the pencil icon to edit it. You can change the type of question, the point value, and the text of the question and answers. You can also edit the answer key by mousing over it and selecting the pencil in the right corner. To save your changes, click the “Update Question” button at the bottom of the question.
To delete a question: mouse over the right side of the question, and then click the X icon.
To rearrange the order of the questions: select the drag-and-drop handle (two rows of dots in the left corner). Then drag and drop the question where you want it.
Tip: If your questions are numbered, be sure to adjust the numbering sequence if you delete or rearrange questions.
How do I add new quiz questions to an existing quiz?
To add a new question or question group, open an existing quiz, and click on “Edit”. Select the “Questions” tab.
To write your own question, select “+ New Question”. Select the question type, and write the questions and answers. Assign a point value, then click the “Update Question” button to save changes.
The next two options help you choose existing questions from the question banks. The question banks include thousands of test items aligned to performance indicators that you can add to existing quizzes. You can either add a group of questions based on a performance indicator, or you can select individual questions.
When you no longer want to use an existing course, you can archive it so that it does not appear on your Dashboard. Archiving courses preserve the data rather than deleting it. This will prevent you from modifying grades, but you will still be able to access the data.
To archive a course, open it and click the “Settings” link. Then, click on “Conclude this Course” on the right side menu. To find your archived courses, click the “Courses” link on the main navigation menu and then click “All Courses”. Your archived courses can be found under the “Past Enrollments” section.
How can I access LAPs in other formats (PDF and Word)?
Each LAP in the Learning Center is available in multiple formats so you can modify them and use them in the best way for your classroom. The formats available for download can be found in the Downloadable section (this section is now called Student Resources in new/revised LAPs) and the Instructor Section of each full LAP module.
Note: If Modules is not set as the Home Page when you open your course, click the Modules link to view the LAPs in your course.
To access the downloadable files: find the LAP you want, and then scroll to the appropriate section in the LAP. Here’s what to look for:
Tip: You can also access and download these files by clicking the Files link on your course navigation menu. Scroll to find the file or use the search field to find a file. Click on a file to preview. To download, use the Download icon in the toolbar, or click the Options icon to the right of the item and select Download. Read more here. You can also download multiple files from the Files section of the course. To download multiple files click the first file, and then press and hold the Ctrl key. While holding down the Ctrl key, click each of the other files or folders you want to select. Once all the files you need are selected, click the Download icon.
Watch video tutorial
Related topics:
How do I delete a course from my account?
Open the course. On the side left menu, click “Settings”. Then, on the right side menu, you will see the option to “Delete this Course”. You’ll be asked to confirm course deletion. When you delete a course, you won’t be able to access it anymore. Make sure you truly do not need to access any data from the course before you delete it. Click “Delete Course”.
How can I help students with login issues?
Issue: My student is not receiving the course invitation email
First, have the student check their junk/spam email folder; some emails may end up there. The emails will come from “MBA-Canvas<notifications@instructure.com>”. If the student has checked their email inbox and junk/spam and still does not see the course invitation email, do the following:
Issue: How do my students enroll in (join) a course using the course invitation email
Students should check their email for the class (course) invitation link. Then click the “Get Started” link in the email to join the course.
View/download this guide to help students register.
Tip: If the course invitation link has expired, the teacher will need to resend the invitation.
Issue: How do my students enroll in (join) a course using the course join link
First, you (the teacher) would need to create a course join link and invite students to self-enroll in the course using the link. Then provide the link to students either through email or some other means. After receiving the link, the student should click the link (or copy/paste the link into a web browser to avoid any typing errors). The student will then be prompted to log in to their Learning Center account. After login, they are automatically enrolled in the course and the course will appear on the student’s Dashboard.
Note: Only students with an existing Learning Center (MBA-Canvas) account can self-enroll using the course join link. New students will not be able to self-enroll; the teacher will need to manually add them to the course.
Issue: The student needs to reset their password
Additional Login Tips:
Many login issues are related to students going to the wrong website or entering the wrong username or password. Have the students check the following:
Caution: Do NOT Google search “Canvas” to log in. Google search will direct users to the FREE Canvas site, which is different from the Learning Center (MBA’s Canvas). The login for the Learning Center will not work on the FREE Canvas site and vice versa.
How do I preview a LAP in Commons?
The Canvas Commons preview screen has a new look and updated features. Users can now preview the content of a LAP (or other resources) in Commons before importing the LAP into a course.
Here’s how to do it: Open Commons. Locate a LAP (or other resources) by using the search field. To preview the LAP, click the LAP title. There are now three tabs with information about the LAP: Preview, Details, and Version notes. The “Preview” tab is the default view.
To preview the LAP content, click a section in the sidebar on the left of the screen. The content of the section is listed in the preview area of the screen. To preview a content item, click the item title.
Content item previews can include the item’s title, description, submission requirements, points possible, links, and attachments. Information provided in the resource preview depends on the type of content previewed.
To see a description of the LAP, click the “Details” tab. The “Version notes” tab gives a history of updates made to the LAP; this tab is grayed out if there are no updates.
Click here to learn more about previewing resources in Commons.
Note: Some of the content in a LAP or preloaded course cannot be previewed in Commons. This includes any Articulate Rise assignments and content found in the “Files” section. In this case, you must import the LAP/course into your Learning Center course to view the content.
How to remove an assignment or quiz from the Gradebook?
To remove an assignment from the Gradebook, you will need to edit the assignment and change the “Display Grade as” field to “Not Graded”.
Click this link for instructions: How to edit details in an assignment?
If the assignment is a quiz/test, you will need to edit the quiz and change the “Quiz Type” to “Practice Quiz”.
Note: Although a practice quiz may be graded in Canvas, practice quizzes are not included in the Gradebook.
Click this link for instructions: What options can I set in a quiz?
Unpublishing an assignment or quiz will also remove the item from the Gradebook; however, students will not be able to access unpublished items. Therefore, if you want students to complete an assignment/quiz, but you don’t want the item to show in the Gradebook, you will need to use the methods described above.
Get more help with the Gradebook here: Canvas Instructor Guide – Grades
How do I create a course join link?
You can enable self-enrollment in your course and create a course join link to allow students to sign up for a course. Self-enrollment can be enabled for a course whether or not the course is publicly visible.
Click the “Settings” link from your course navigation menu. Click the “Course Details” tab. At the bottom of the page, click the “More Options” link. Select “Let students self-enroll by sharing with them a secret URL.” Click the “Update Course Details” button to save changes. The URL (join link) will now appear at the bottom of the page. Copy and paste the join link and distribute it to students.
Note: Only students with an existing Learning Center (Canvas) account can self-enroll. New students will not be able to self-enroll; you will need to manually add them to the course (see instructions here).
How to set Availability dates for an assignment or quiz?
The Availability dates in Canvas allow the instructor to set a specific date range when students can submit an assignment or take a quiz. The instructor may use the availability dates as an alternate way to lock a quiz.
To view/edit Availability Dates: Open the assignment or quiz, click the Edit button, and scroll to the “Assign” section (at the bottom of the page). Adjust the “Available from” and “Until” date fields to your liking. You may choose to set one or both fields. Be sure to save your changes.
Note: By default, Canvas sets the availability date fields to blank. When the assignment/quiz is published, blank availability date fields allow the assignment to be viewed throughout the entire course. If you want to keep an assignment/quiz open throughout the entire course, do not set any availability dates.
Learn more in the Canvas Instructor Guide: Availability dates
Did You Know? You can also lock a quiz using the “Lock this Quiz Now” feature. See topic: How do I lock/unlock a quiz?
How do I fix a broken link error on an assignment?
A broken link error may occur when a file for an assignment is missing or mislabeled. There are a couple of ways to address this issue: 1) Re-add the file to the assignment, or 2) Reload the assignment to your course.
1) Re-add the file to the assignment:
Search the “Files” section of your course to see if the file exists. Open the course; select “Files”. The file may have been renamed, so search carefully. If you find the file, then link the file to the assignment using these steps:
1. Open the Assignment.
2. Click Edit.
3. Delete the reference to the file shown in the Text Editor.
4. On the right side of the screen, click the “Files” tab.
5. Click on the filename to add it to the Text Editor.
6. Save the Assignment.
If the file is not listed in the “Files” section and you have the file saved to your computer, then upload the missing file to the course. Click here for instructions to upload the file. Then follow the steps above to link the uploaded file to the assignment.
OR
2) Reload the assignment to your course:
Is the assignment part of an MBA Research LAP? Then reload that assignment to the course. First, download the LAP from Commons to your computer. Next, import the LAP to your course using the Course Import Tool. Be sure to choose the option to “select specific content” and then select only the assignment that you want to reload. Click here for detailed instructions.
If you are still having problems with a broken link error after trying these steps, or if the broken link is due to an erroneous website link, please contact us for help.
How do I view my favorite courses on the Dashboard?
Is your Dashboard getting too crowded? Do you wish you could easily find your favorite courses? If so, you can remove infrequently used courses from your Dashboard by marking your favorite courses. Your Dashboard must be in Card View to view favorites on the Dashboard.
To mark favorite courses: from the Global Navigation Menu, click the “Courses” link, and then click the “All Courses” link. Next to each course is a star icon. To favorite a course, click the star next to the course. Courses with filled stars show the course is a favorite. Uncheck a star icon to remove the course as a favorite.
Marking favorite courses affects the Dashboard course cards and the Course list under the Courses link. Once you have selected at least one course as a favorite, only your favorite courses will appear on the Dashboard and in the Courses list. Read more here: Customize the course list
Note: You may also archive a course to remove it from your Dashboard, but maintain the course in your “All Courses” list. Removing a course from the Dashboard does not permanently delete a course. At any time, you can view all your courses by clicking the “Courses” link, then “All Courses”.
How to download a LAP directly from Commons?
You can download LAPs directly from the Learning Center Commons to your computer. This is one way to access the downloadable content without first importing the LAP into your course. You can also download a LAP for use in another Learning Management System (LMS), such as another Canvas or Schoology. The LAP download will be either an IMSCC or ZIP file, so be sure that the platform in which you wish to use the LAP can accept these file formats.
Note: Prior permission (special licensing agreement) is required to use our copyrighted modules in another platform or LMS. You will need to sign and return the Licensing Agreement before using our content in another LMS. Contact us for details.
To download a LAP: Open Commons. Find the LAP you want to download. Click on the LAP title to preview it. Click the blue Import/Download button. Click the Download button. Depending on your browser settings, you may get a pop-up box asking you what to do with the file. Save the file to a folder of your choice. If your browser is set up to automatically save, check your Downloads folder (or the default location set in your browser) for the file.
Notes:
Did You Know? You can download our preloaded courses using the same steps.
Are you a teacher in the High School of Business™ program? The LAPs that correspond to each HSB project have already been imported into Canvas courses. Go to Commons, click Filter, then under Shared With select High School of Business. To download the course LAPs for use outside of the Learning Center: Find the course (project) that you want to use, then click the blue Import/Download button. Click the Download button. Depending on your browser settings, you may get a pop-up box asking you what to do with the file. Save the file to a folder of your choice. If your browser is set up to automatically save, check your Downloads folder (or the default location set in your browser) for the file. You will find the downloadable content in the web_resources folder in the ZIP file (see Notes above).
Related FAQs:
Tips for using the Canvas Dashboard in a web browser vs the Teacher Mobile App
What you do on the Canvas Dashboard in a web browser will affect what you see on the Canvas Teacher Mobile App and vice versa.
Here are some tips when using the Dashboard in a web browser versus in the Mobile App:
Web browser Dashboard:
Mobile App Dashboard (Courses link):
How do I use a rubric to grade an assignment?
You can add the rubric to an assignment and use the rubric for grading and adding comments.
Edit the rubric:
1. Open the assignment that has the rubric attached to it.
2. To edit the rubric, click the Edit icon (pencil) in the right top corner of the rubric.
3. Scroll to the bottom of the rubric, and select the “Use this rubric for assignment grading” checkbox.
4. Click the “Update Rubric” button to save changes.
5. You may get a pop-up message about assignment points; click “Change” to use the rubric’s point system.
Note: If you do not select the rubric specifically for grading, you can still use the rubric to evaluate an assignment but the score will not update automatically.
Next, grade the assignment:
1. Open the Gradebook: click on the “Grades” link.
2. Click on the student’s name.
3. Find the assignment and click on the assignment name to view the student’s submission.
4. In the upper right corner, click “Show Rubric”.
5. Fill out the rubric assessment and click on the comment box to add feedback.
6. Click “Save Comment” to save assessment and feedback.
7. The grade will appear in the upper right corner and the Gradebook.
8. Repeat these steps for each student.
Alternatively, you may choose to use SpeedGrader for easier grading. Click here for instructions.
How to mute or unmute an assignment in the Gradebook?
By default, when you grade assignments, Canvas allows the student to immediately see the grade. In some cases, you may wish to hold student grades until all assignments have been graded, and then release grades to all students at the same time. To temporarily hide student grades, you can mute an assignment. Students will still be able to see and submit a muted assignment. Muting is a temporary block that should not be used longer than necessary.
To mute an assignment: In course navigation, click on “Grades” and hover over the name of the assignment. Click the drop-down menu. You will see the option to mute the assignment; click the “Mute Assignment” link. You will be asked to confirm; click the “Mute Assignment” button to confirm. You will then see the mute icon (a bell with a slash through it) next to the assignment name, indicating that the assignment has been muted. You can unmute assignments the same way. Also, the Total column in the Gradebook displays a mute icon, warning that your grade view is different from the student’s grade view because of the muted assignment.
You can unmute an assignment following the same steps. In the drop-down menu, click “Unmute Assignment” and confirm your changes.
Read more about this topic here.
How do I use the Conferences feature in the Learning Center?
A conference can be used to hold virtual meetings or host virtual speakers within the Learning Center. As an instructor, you can create new conferences, start conferences, and manage concluded conferences.
To create a Conference, open your course and click the “Conferences” link. Click the “+Conference” button in the right corner. Name your conference, set a time limit (or select the “No time limit” option), decide whether to record the conference and add a description. Next, invite users to join your conference. By default, all course members will be invited. To only include certain members of the course, uncheck the box next to “Invite All Course Members.” A list of users will appear; select the checkboxes next to the members you would like to invite. Finally, click “Update” to save the conference.
Read more about the Conferences feature here.
How do students view rubric results for an assignment?
Students can view their rubric results for an assignment on the Grades page. On the Course Navigation, click the “Grades” link. If an assignment has a rubric, the assignment will display the rubric icon (it looks like a clipboard). To open the rubric, click the Rubric icon. Then, students can view the rubric results for their assignments and any comments from the instructor. To close the rubric, click the “Close Rubric” link at the top of the rubric.
Related topic: How do students view the rubric for a graded discussion?
What should I do at the end of each term?
School is out! Be sure to clean up your Learning Center account before the break!
Courses and Grades:
Student Accounts:
Download the End-of-Course Checklist
How do I adjust the course term dates?
The term dates will specify when the course starts and ends. When you create a course and use one of the predefined terms set by MBA Research (do not use “Default Term”), your course will inherit the term dates set by MBA Research, which are July 1 of the start year to June 30 of the end year. However, as an instructor, you may need to change the start and end dates for your course. Dates can be shorter than or overlap the predefined term dates.
To adjust the course term dates: Open your course, and click the “Settings” link. Under the “Course Details” tab, you will see the “Starts” and “Ends” fields. Click the “Starts” calendar icon to select a new start date. Click the “Ends” calendar icon to select a new end date. You can also type a date into these fields. Then click the “Update Course Details” button at the bottom of the screen.
Note: The “Starts” and “Ends” fields can be blank. If the fields are blank, the course will start and end based on the predefined term start and end dates mentioned above.
Read more information on course term dates here.
How to access the downloadable content from a LAP or preloaded course?
Some content in our LAPs and preloaded courses are available in other formats (PDF, Word, PPT) that can be downloaded. You can access the downloadable content by either importing the content into your course or by downloading the content directly to your computer.
Note: If you have already imported the LAP from Commons into your Canvas course, skip this tutorial and instead see the related topic: How can I access LAPs in other formats (PDF and Word)?
To proceed, find the LAP or preloaded course in the Learning Center Commons. Then, use one of these methods to access the content:
1) Import the LAP or preloaded course into your Canvas course. In Commons, click on the blue link title of the LAP or course. Click the Import/Download button. Then select the Canvas course and click Import into Course. After the content is imported, open your course and look for the downloadable content under the Downloadable and Instructor Section of the course. See what content to look for here.
OR
2) Download the LAP or preloaded course directly to your computer(recommended for tech-savvy users). Click here for instructions.
How do I view updates and import updated content into my courses?
Note: The information in this tutorial applies to all resources shared in the Commons, including LAP modules, preloaded courses, assignments, and quizzes. For the course you wish to update, the Term must be the current term and the course End Date (if used) cannot be in the past. If your course is a past term, you must update the Term and/or End Date in Course Settings to import the updated content into the course.
As we make changes to resources in the Learning Center, you may want to update your course(s) to make sure you are using the latest version of the resource. An announcement on the Learning Center Dashboard will provide a general list of available updates. This list may not reflect what you have imported into your course(s). If you imported the resource into your course(s) before the update date, you will have the option to update the content in your course(s). When an update is available, the Updates link at the top of the Commons page will display the number of pending updates. A pop-up notification box will also appear in the Commons. After reviewing the available updates, see the Best Practices box below to determine how to proceed with an update.
BEST PRACTICES:
Review the version notes of the updated content to see if the change affects a LAP (or module), a specific content type (such as a quiz or assignment), or if it is a minor change (such as a link fix).
To View Available Updates: click the Commons link on the main navigation menu, then click the Updates link. You can also click the View Update Notes button in the notification box.
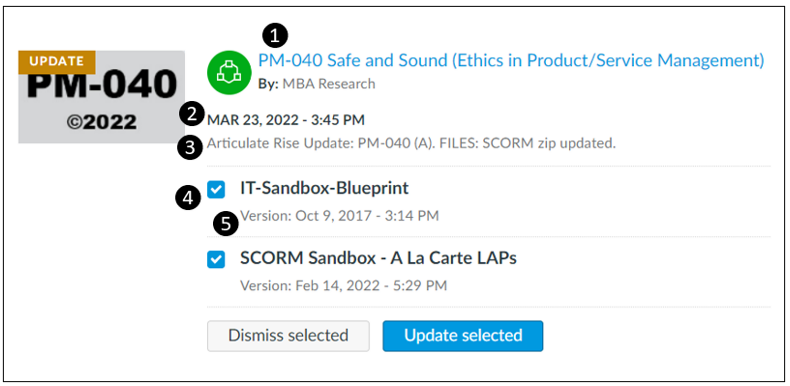
The Updates page shows a list of changes available for the content in your Learning Center course(s). You will see the name of the updated resource[1], the date and time the content was last updated [2], the notes of what was updated [3], which course(s) you previously imported the content into [4], and the version of the content you are currently using [5].
To preview the updated content or view the full version history, click on the name of the resource. Learn more about previewing content here.
To Update Your Course(s):
Go to the Updates page. If the content appears in more than one course, you have the option to select which course(s) will receive the update. To select or deselect a course for an update, click the checkbox next to the course name. Then, click the Update or Update selected button. To confirm, click the Yes button. The latest version of the content will be imported into your course(s). To view your imported content, navigate to the feature area (e.g., Modules, Assignments, Quizzes, Discussions, Pages, or Files) in your course.
Important Notes:
Dismiss Update: To ignore the update for the selected course(s), click the Dismiss or Dismiss selected button. To confirm dismissal, click the Yes button. If you ignore the update for the selected course(s), you will still be notified of future updates to the resource.
Alternate Update Method: This method uses the Course Import Tool to import the updated content into your course.
Related Links:
How do I view a user’s profile in a course?
Profiles allow you to view a user’s name, default email address, and profile picture, as well as course enrollment and user role.
To view a profile: Open your course; click the “People” link in the Course Navigation menu. Search for the name of the user. Click the user’s “Options” icon (three vertical dots), then select the “User Details” link.
To view membership details about a user click the “more user details” link. The Memberships section shows the user’s course enrollment and user role, as well as course privileges. You may also conclude the enrollment and delete the enrollment.
The sidebar on the right of the page includes links to additional information about the user such as a detailed grade report, interactions report, access report, student analytics, and user account details. The user account details page allows you to view all the active course and group enrollments for the student in any courses and groups where you are the instructor.
Learn more from the Canvas Guide
What should I do at the beginning of each term?
Before the school year starts, review your Learning Center subscription and account.
Make sure that your school’s subscription to the Learning Center is up-to-date. Renew subscriptions online at The MBA Shop or send inquiries to service@mbaresearch.org.
Courses:
Note: Courses created using a previous term are automatically archived and will no longer appear on the Dashboard. You can view archived courses under the Courses menu (from the main navigation menu, click the “Courses” link, then click “All Courses” and see “Past Enrollments”). If you want to use a course from a past enrollment term, you can move the course to a new enrollment term (see instructions here).
Student Accounts:
Note: Kentucky educators have an upgraded membership that includes student licenses (no additional purchase needed). If you are in the High School of Business™ program, student licenses are already included in your Learning Center subscription.
Download the Beginning-of-Course Checklist
How do I use the Course Import Tool?
The Course Import Tool makes it easy to extract course content, assignments, and quizzes from previous terms and quickly import them into existing courses. You can also import course materials from different Learning Management Systems using this tool.
To access the Course Import Tool: Open your course and click the “Settings” link. In the sidebar on the right, click the “Import Course Content” link.
Use the Course Import Tool to:
• Copy course content from term to term, including Announcements and Discussions. You can adjust the events and due dates to coordinate with the current term.
• Select specific course content you want to be copied. You can select individual Assignments, Pages, Files, and anything else from previous courses you or your colleagues have taught.
• Import course materials from different Learning Management Systems. The Course Import Tool does not import user content.
Learn more from the Canvas Guide
How do I change the language preference in my Learning Center account?
The Learning Center (Canvas) default language is English, but you can choose to view the Canvas interface in another language.
In the Global Navigation menu, click the Account link, then click the Settings link. Click the Edit Settings button and in the Language drop-down menu, choose your preferred language. Click the Update Settings button to save your changes. Now you can view Canvas in your preferred language.
Note: Instructors have the option to change the language preference for their courses (most often used when teaching a foreign language course). The course language will override the language in your user settings.
The Learning Center content (LAPs, preloaded courses, etc.) is in English when added to Canvas. Changing the language in the user setting or the course setting will not translate the content into your preferred language.
Learn more:
What languages does Canvas support?
How do I change the language preference for a course?
How do I change the language preference in my user account as an instructor?
How do I change the language preference in my user account as a student?
How do I translate the Learning Center content into another language?
The Learning Center (Canvas) content is in English by default. While users may change the language preference for the Canvas interface (click here for details), Canvas cannot translate the content (LAPs/modules, courses, etc.) into another language.
We suggest using the web browser’s language setting to translate the content of a Canvas page into the preferred language. Click on the link below for instructions on how to turn on translation for that web browser:
Chrome – Recommended
Firefox – Does not come with translation features, but you can install an add-on of your choice to translate content. See a list of add-ons here.
Edge
Safari
How do I move content from the Learning Center to another Canvas?
Permission (special licensing agreement) is required to use our copyrighted modules in another platform or LMS. Before moving our content to another LMS, please sign and return the Licensing Agreement attached to the Welcome email. Contact us for details.
The best practice for moving the content from the Learning Center is to first create the course in the Learning Center, then export the course to another Canvas (option 1). However, you may choose to export individual LAPs or preloaded courses directly from the Commons without creating a course in the Learning Center (option 2). Choose the option that best suits your needs.
TIP: When working in two different Canvas systems simultaneously (such as your school’s Canvas and the Learning Center), it is best to open them in different web browsers. For example, open your school’s Canvas in Firefox and open the Learning Center in Chrome. This will eliminate confusion and allow you to stay logged in to both sessions at the same time.
OPTION #1 – Create a Course in the Learning Center and Export the Course to another Canvas (best practice)
Note: Steps 1 and 2 are performed in the Learning Center (MBA Canvas). Steps 3 and 4 are performed in your school’s Canvas system.
OPTION #2 – Export Individual LAPs from the Learning Center Commons to Import into another Canvas
Note: Our preloaded courses and our newly revised LAPs contain Articulate Rise lessons which use the SCORM LTI tool to display the content. When you move the Articulate Rise lessons to your school’s Canvas, the SCORM files are not automatically copied over in the Canvas Course Import process. You must take some additional steps to view the Articulate Rise lessons in your school’s Canvas. See: How to use Articulate Rise lessons in another Canvas system (pdf).
How do I publish or unpublish a LAP module?
As an instructor, you can publish or unpublish a module in a course. Unpublished modules are invisible to students.
When you import a LAP (module) into your Learning Center course, the LAP is already published by default. The items in a LAP are also already published, except for the contents under the Instructor Section of a LAP. The Instructor Section contains additional reference material, including answer keys, the discussion guide, and other content intended just for teachers.
A green icon (to the right of the module title) indicates the module is published. A gray icon indicates an unpublished module. You can change the status of a module by toggling the published or unpublished icons.
To unpublish a module, hover over the published icon. The hover text will confirm you want to unpublish the module. Click the icon to confirm.
Note: The status of the module overrides the state of module items. Therefore, students will not be able to access a published item that is part of an unpublished module.
To publish a module, click the module’s unpublished icon. The hover text will confirm you want to publish the module.
Tip: You can change the status of module content items in the same way as you would a module. Hover over the status icon to publish or unpublish the item.
An Important Note of Caution:
Publishing a module will automatically publish any unpublished content items within the module. This means that if you unpublish a LAP module in your course and later re-publish the module, then all of the module content items (including the Instructor Section items that were previously unpublished) now become published and visible to students. You can manually unpublish individual module items to make them invisible to students.
Tip: The majority of the items in the Instructor Section are files. You can bulk edit the status of files by going to the Files section of your course. In the Files section, select the files you want to change (hold the command or control key to select multiple files), then click the “Manage Access” icon (cloud with a lock). More about Managing Files here.
Learn more about this topic from the Canvas Guide.
What kinds of quiz statistics are available?
You can view quiz statistics for published quizzes that have at least one submission.
On the Course Navigation menu, click the Quizzes link. Click the title of the quiz you want to open. Click the Quiz Statistics link.
Note: The Quiz Statistics link will not be available until at least one student has completed the quiz. If a student had multiple assignment attempts, quiz stats will only display the kept score for the student (highest score or latest score). Editing a quiz with student submissions may affect quiz statistics.
The kinds of quiz statistics available are:
• The Quiz Summary includes the quiz average score, high score, low score, standard deviation (how far the values are spread across the entire score range), and average time of quiz completion.
• The Question Breakdown includes the total percentage of students who answered the question correctly; the number (and name) of respondents who selected the answer; and an item discrimination index, which attempts to look at a spread of scores and reflect differences in student achievement.
By default, the quiz summary shows statistics for all course sections. To view quiz statistics for a section, click the Section Filter drop-down menu.
View detailed analysis reports by clicking the Student Analysis link or the Item Analysis link. These links will generate a downloadable CSV file that contains additional survey results.
More details about quiz statistics are available in the Canvas Guide.
Learn more from the Canvas Guide
Related Topics:
How do I track student activity in the Learning Center?
Below are common ways to track student activity in the Learning Center. Click the links for details and instructions.
View the page views for a user. This is the best indicator with a date/time stamp of user interaction with the system. This can be exported to a CSV file. You can only view it on an individual user basis.
Use New Analytics to view individual student activity in your course. Student analytics show you how well a particular student is doing in your course. Available analytics include course grades, weekly online activity, and communication.
View the course access report for an individual user. This report shows a summary of user participation in your course and complements the Total Activity column on the People page of your course.
Run “Last Enrollment Activity” or “Last User Access” reports. These reports are created at the account (not course) level, so they give data for all users (teachers, students, etc.) set up in your school’s account. For the last activity by course, see the People page of your course.
Related Topics:
New Analytics is a tool to help you see how students are doing in your course. You can view analytics in both active and concluded courses. However, only active student enrollments are included in the data for New Analytics. Available analytics include course grades, weekly online activity, and communication.
To Open New Analytics: Open your course and click the “New Analytics” button on the Home page, or click the “New Analytics” link in the Course Navigation menu.
To View Student Analytics: In New Analytics, click the Student tab. Then click on an individual student’s name to view data for that student.
Use New Analytics to:
Notes:
Learn more about New Analytics in the Canvas Guides
How do I move content from the Learning Center to Google Classroom?
Prior permission (special licensing agreement) is required to use our copyrighted modules in another platform or LMS. You will need to sign and return the Licensing Agreement before using our content in another LMS. Contact us for details.
Please note that not all content is compatible with Google Classroom; only the WORD, PDF, and PPT files can be moved to that platform. This includes student narratives, discussion guides, activities, and some tests. Many of our quizzes are created as Canvas quizzes, but you may copy/paste them into Google Docs or Forms to use them. See download formats here.
The best practice for moving content from the Learning Center (Canvas) to Google Classroom is to first build your course in Canvas. After building your course you may access the downloadable files in one of two ways:
1) Access the downloadable content from the Home page of your course (or Modules page, if Modules is not set as your Home page):
OR
2) Access the downloadable content from the Files page of your course. This option allows you to view all the downloadable files in your course and download multiple files at once.
Watch the video tutorial.
View screenshot instructions: Importing into Google Classroom (pdf)
Not sure how to create a course in the Learning Center? See this FAQ.
Did you know? Canvas has a Google Assignments LTI tool that integrates Google Assignments, Docs, and Drive into Canvas. Click here to learn more about this tool and how to use it.
How do I give students access to the LAPs?
Teachers can give students access to the Learning Center LAPs using one of these methods:
Related Topics:
How to create a course?
How do I search for LAPs in the Learning Center to add to my course?
How do I add students to a course?
How do I move content from the Learning Center to another Canvas?
How do I change the Course Home Page?
The Course Home Page is the first page students see when they open the course. The Home Page also helps students understand how they can navigate through the course. You can customize the Home Page to create a specific workflow for your students, and to show a welcome message, links, images, or other information for students.
By default, Canvas sets the Course Home Page to Modules view. But you can change the Home Page to reflect one of five layout options: the Recent Activity Dashboard (Course Activity Stream), Pages Front Page, the Course Modules, the Assignment List, or the Syllabus.
Change the Course Home Page: Open your course. In the Home Page sidebar, click the Choose Home Page button (depending on your screen size this button may appear on the right or at the bottom of your screen). Click the radio button next to the Home Page layout you prefer. Click the Save button.
Note: You must set a Front Page before selecting the Pages Front Page option. Only published pages can be set as the Front Page. Click here for detailed instructions (with images).
To create a custom Course Home Page, you must first create the page, then set the page as the Front Page.
View the Canvas Guide Instructions (with images)
How do I use the Google Assignments LTI tool in Canvas?
What is it? The Google Assignments LTI tool is an external tool that integrates Google Assignments, Docs, and Drive into Canvas. The LTI tool allows you to:
What is Google Assignments? An add-on application for your learning management system (LMS). Assignments bring together the capabilities of Google Docs, Drive, and Search into a new tool for collecting and grading student work. Learn more about Google Assignments at these links:
How to use the Google Assignments LTI Tool in Canvas?
Note: The Google Assignments (LTI 1.3) tool is already installed (activated) in the Learning Center. But you (educators) must have a Google Workspace for Education account to use it (the account usually looks like yourname@yourschool.edu).
Select Assignments as an External Tool Submission Type:
Find out more here.
Other Ways to Use Assignments and Drive in Canvas:
See also:
Notes:
Resource Links:
How do I work with Modules (LAPs) in the Learning Center?
All Learning Center LAPs are created as modules. Modules control the entire flow of your course and its content. They create a one-directional linear flow of what you would like your students to do. Course content items are nested within each module. You can view the modules in your course from the Home link (if the Course Home Page is set to modules) or from the Modules link.
Module Global Settings: These buttons appear at the top of your course. You can collapse or expand all modules, view a student’s progress in a module, and create a new module.
Module Header/Settings: Each module header contains the name of the module. The header may also contain module prerequisites and module requirements (if any setup). The icons on the right side of the module name are the module settings; they control the entire module. Use the status icon to publish or unpublish an entire module. You can also add a new content item to the module. Using the Options drop-down menu (3 dots to the right of the module name), you can edit a module, delete a module, and reorder all modules and module items.
Module Items and Icons: Modules can be filled with different types of content. Each module item also includes an icon with its type. View the list of icons here. The content types that may be included in a module are:
Collapse/expand a module: By default, modules are expanded and show all items in the module. To collapse a module, click the collapse arrow (to the left of the module title). You can also use the Collapse All or Expand All button in the module’s global settings.
Add a module: You can create your own module or add a LAP module to your course. To create your own module: click the + Module button, type a name in the Module Name field, set any restrictions or prerequisites (optional), then click the Add Module button. Learn more here.
Organize modules in your course: Modules are organized by order of progression. LAPs appear in the order in which you import them into the course. After you have imported all of the LAPs you need for a course, you can organize them in the order in which you want to teach them.
You can move or reorder modules using either of these methods:
Edit a module: Locate the name of the module and click the Options icon. Select the Edit link. You can rename the module, lock modules, add prerequisites, add requirements, and require students to move through module items in order. Click the Update Module button to save changes. Learn more here.
Delete a module: Locate the name of the module and click the Options icon. Select the Delete link, then click OK to confirm deletion.
Learn more from the Canvas Guide
Related Topics:
How do I use the Canvas App Center?
The Canvas App Center is your gateway to powerful teaching tools that are easily integrated into a Learning Center (Canvas) course or account. In the App Center, you can specify which external applications (apps) will integrate with your course or account. Apps are an easy way to add new features to Canvas. Some apps are free, but others require a subscription.
Note: MBA Research does not provide free subscriptions for these apps so make sure that you (or your school) have a subscription for an app before trying to install it.
To access the App Center:
Course level: Open your course. Click the Settings link. Then click the Apps tab.
Account level: Click the Admin link and select your school. Next, click the Settings link and then click the Apps tab.
Note: Apps added at the Course level are only available for that course. To make an app available to all the courses in your account, add the app at the Account level.
To use the App Center:
By default, the App Center shows all apps available in your course or account. You can filter by installed and not installed or use the search field to locate a specific app (search by app name or keyword).
To view a quick description of an app, hover over the app. To view all details, click the app. When you are ready to install the app with the proper credentials, click the +Add App button.
Note: Some apps require a Consumer Key and Shared Secret to install. Make sure that you have that information available before trying to install the app. In some cases, there may be a link in the app details that allows you to generate the key/secret; otherwise, you must contact the app provider to get the proper credentials.
To view existing apps and configurations in your course or account, click the View App Configurations button. For further instructions on how to use the Apps Configuration page, see the Canvas Guide (linked below).
If you have additional questions or need help installing an External App (LTI Tool) contact us.
See Canvas Guide Instructions (with images):
Does the Learning Center work with browser lockdown apps?
Yes, the Learning Center (Canvas) can work with browser lockdown apps. A browser lockdown app is a good way to prevent cheating during online tests.
The apps are available as LTI tools (External Apps) and can be added at the course or account level in Canvas. You or your school will need to have a subscription for the app you want to install. MBA Research does not provide free subscriptions for these apps.
Search for the app by name in the Canvas App Center. There are currently two browser lockdown apps available in the Canvas App Center: Honorlock and Lockdown Browser
Learn how to access the Canvas App Center and install an app here
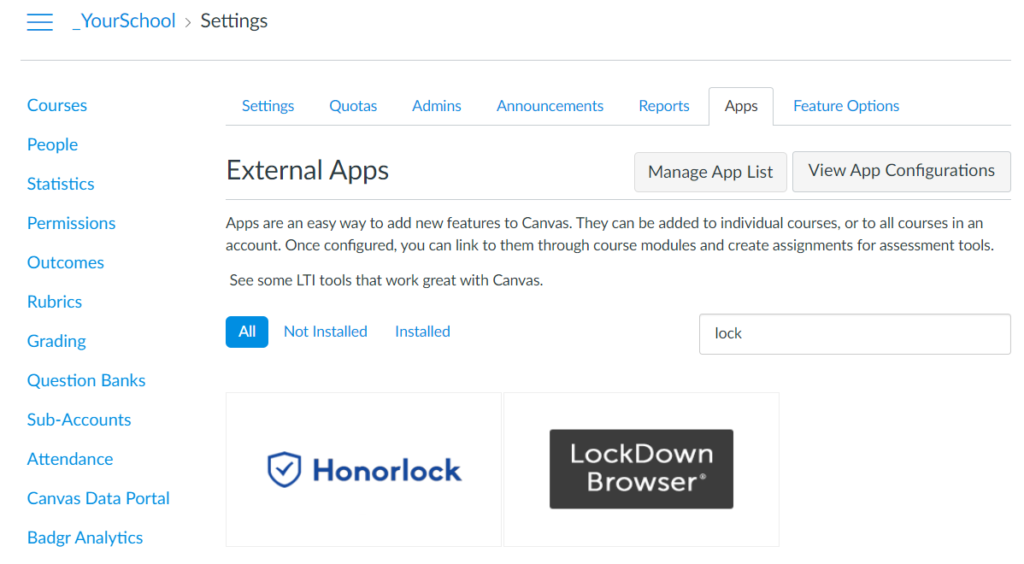
Tip: In the App Center, type “proctor” in the search field to find additional proctoring apps.
If you have additional questions or need help installing an External App (LTI Tool) contact us.
How do I publish or unpublish an assignment?
As an instructor, you can publish or unpublish an assignment in a course. Unpublished assignments are invisible to students and excluded from grade calculations. You can manage the state of all assignments on the Assignments Page, or you can manage each assignment individually. Assignments included in a LAP or preloaded course are published by default.
How to do it: Locate the assignment within the course, or on the Assignments Page. Green icons indicate the assignment is published. Gray icons indicate unpublished assignments. You can change the status of an assignment by toggling the published and unpublished icons.
To publish an assignment, click the assignment’s unpublished icon. The hover text will confirm you want to publish the assignment.
To unpublish an assignment, hover over the assignment’s published icon and view its status. If the assignment can be unpublished, the hover text will confirm you want to unpublish the assignment. Click the icon to confirm.
Notes:
View the Canvas Guide Instructions (with images)
A Learning Activity Package (LAP) is a comprehensive, ready-to-use lesson plan based on a single performance indicator from the National Standards for Business Administration. The acronym LAP can also stand for leadership, attitude, and performance: These are the qualities that students should be able to exhibit as a result of instruction.
Each LAP provides in-depth learning, with a focus on real-life application in the business community. LAPs are designed to help students move beyond learning “about” business to learning to “do” business in the real world, providing more depth and a greater focus on application than a typical textbook.
Each LAP module is ready to use–no special preparation and no lesson plans to write! We provide you with everything needed, including an in-depth student narrative, handouts, activities, assessments, discussion guide, glossary, PowerPoint presentation, links, and much more.
Click here to learn more about LAPs including:
There are two ways to access MBA LAPs:
If you have a subscription to the MBA Research Learning Center, log in to the Learning Center and search for LAPs in the Commons section. Click here for instructions on how to search for LAPs in the Commons.
You may purchase the LAP Digital Download (PDF) or a subscription to the Learning Center in our online store, or contact us to place an order.
Note: If you are an educator in an Enhanced Member state or a High School of Business™ (HSB) participant your access to the Learning Center is covered by your membership/affiliation fee. Email us for access. Be sure to include your name, school name, state, and school-issued email address in the email.
Where do I find additional information about LAPs?
You can find additional information about a LAP such as performance indicator, curriculum planning level, objectives, and other teaching references.
Related Links:
How do I prevent cheating on a quiz or exam?
Use a lockdown browser app to prevent cheating during online tests. The Learning Center (Canvas) works with the following third-party lockdown browser applications: LockDown Browser and HonorLock. Learn more here. MBA Research does not provide free subscriptions for these apps. You or your school will need to have a subscription for the app you want to install. Once you have a subscription you can install the app in your school’s Learning Center account. Allowing open book testing will depend on the app and the settings available in that app.
Installing a lockdown browser app is the best way to prevent cheating, but here are some additional suggestions:
Related Links:
How do I use the Microsoft Immersive Reader in the Learning Center?
Canvas offers the Microsoft Immersive Reader feature to enhance the user reading experience and improve accessibility. However, at this time we are not enabling the feature in the Learning Center at the account level (globally). The limitations of the feature (as noted below) were the main driving force behind that decision. Perhaps as the development of the feature improves, we may consider enabling it globally in the Learning Center. Nevertheless, Microsoft Immersive Reader is available for users to enable individually (in User Settings), regardless of the preference set at the account level.
To enable the feature at the user level: from the main navigation menu, click the Account link, then click Settings and scroll to Feature Options section. Find Microsoft Immersive Reader in the list of options and click the feature State icon, then click Enabled to turn on the feature.
How to use it: To see the Immersive Reader button, open a supported content page in your course (a page, assignment, course home page, or the syllabus).
Learn more from the Canvas Guide for Instructors
Learn more from the Canvas Guide for Students
Related Link:
How do I delete content from a Learning Center course?
You can delete content that is no longer needed from your Learning Center courses. This includes assignments, quizzes, pages, files, and modules. Click the appropriate link below for specific instructions.
How do I delete an assignment?
How do I delete a page in a course?
How do I delete a file or folder as an instructor?
Note about deleting a module: When you delete a module, all of the items in that module are removed, but they are not deleted from the course. You will need to go to the section of the course where that item is located and delete the item from that section. Follow the best practice below to delete a module along with the module items.
Best Practice:
If you want to delete a module and all the items in that module from a course, first delete the items then delete the module.
Note: Canvas does not have a way to bulk delete items from the module. However, you can bulk delete pages and files (see the specific instructions linked above).
How do I view grades and student progress in a Learning Center course?
For Instructors:
For Students:
Tip: Instructors may set Due Dates on assignments as a way to guide students through the course. Assignments with due dates will appear on the student’s Dashboard under the “To Do” sidebar allowing them to track their progress in the course. Assignments with due dates will also appear on the Canvas Calendar.
What is the SCORM feature in the Learning Center?
SCORM is a set of technical standards for eLearning software products; it standardizes the way eLearning courses are created and launched. In the Learning Center, the SCORM feature allows us to display the Articulate Rise assignments (or Rise lessons), which are included in the Learning Center Course Guides, as well as in many new and revised LAPs.
How is SCORM enabled? The SCORM LTI tool is already enabled in the Learning Center. In the Learning Center, the SCORM link appears in the course navigation menu when Rise lessons are included in a course. If you do not see the SCORM link, go to the course Settings, click the Navigation tab, drag the SCORM link to the list of visible links, then click Save.
The SCORM link is not available for students to view, despite its lack of the crossed eye icon. Teachers should not delete or edit the contents of the SCORM section of a Learning Center course in any way as doing so may cause the Articulate Rise lessons to stop working.
Canvas supports the following versions of SCORM: SCORM 1.2 and SCORM 2004 (2nd, 3rd, and 4th Edition). The Articulate Rise lessons are created using SCORM 1.2.
Using SCORM in another Canvas: If your school has its own Canvas system, the SCORM LTI tool must be enabled at the account level to use Articulate Rise lessons in that Canvas. Your school’s Canvas administrator will need to contact their Canvas Customer Success Manager to have the feature enabled in your school’s Canvas. Once the SCORM tool is enabled, there are some additional steps to take to use the lessons in your school’s Canvas. See the instructions linked below on how to use Articulate Rise lessons in another Canvas system.
If you use one of MBA Research’s preloaded courses, the SCORM files are included in the Canvas Course Export file. If you download the individual LAPs, you must request the SCORM files from us. Contact us and include the LAP numbers for which SCORM is needed.
Note: If the interactive lessons cannot be enabled in your Canvas, students may still access the student readings (core narrative) from the PDF version of the LAP. Depending on the LAP the PDF version uses one of the following names: Downloadable Student Guide, Downloadable Student Handout, Student Core Narrative Handout, or Student Narrative. In a Canvas course, find the PDF version under Unit Pages (preloaded courses only), Modules, and Files sections.
Learn more about SCORM:
Related Topic:
What are Learning Center Course Guides?
The Learning Center Course Guides (LCCG) are structured, ready-to-use courses preloaded with lesson plans, teacher guides, LAPs, activities, and other resources needed to teach the course. If you have previously used the Traditional Course Guides (PDF version via Digital Download) offered by MBA Research, then you are aware that they provide a variety of educational materials, including performance indicators, ethical case studies, and activities for each course. The new Learning Center Course Guides are organized differently from our Traditional Course Guides, but the content found within is largely the same.
The Learning Center Course Guides combine the LAPs available in the Learning Center Commons with the Traditional Course Guides. Additionally, the Learning Center Course Guides contain Articulate Rise assignments, which are interactive lessons that include all the content from the PDF version of a LAP (also referred to as the Student Core Narrative Handout).
| Learning Center LAPs + Traditional Course Guides = Learning Center Course Guides or Lesson plans + Course structure and teacher guides = A complete course |
To access the LCCG courses: Log in to the Learning Center. Click the Commons link and type “Learning Center Course Guide” into the search bar. You can then import/download it into your course. These courses may be quite large so we recommend importing a single course into an empty course shell.
Did you know? The Learning Center Course Guides replace the former LAPs-only preloaded courses. The LAPs-only course formats are no longer available in the Learning Center Commons. However, the Traditional Course Guides are still available; click here and follow the instructions to access them.
Watch our Webinar series to learn how to use the Learning Center Course Guides:
What are Articulate Rise assignments?
Articulate Rise assignments (or Rise lessons) are interactive lessons that include all the content from the PDF version of a LAP (also referred to as the Student Core Narrative Handout). The interactive content includes sorting games, flashcards, matching games, quote slideshows, and more. Students have the ability to see their completion status as they progress through the Rise lesson. There is also a summary of the content at the end of each lesson.
Rise lessons appear in the Learning Center Course Guides, as well as in new and revised LAPs. Teachers and students may access the Rise lessons using the Assignments link (or Pages and Modules link if assignments have been added to them).
The Rise lessons are displayed in the Learning Center using the SCORM LTI tool. Teachers should not delete or edit the contents in the SCORM section of a Learning Center course in any way as doing so may cause the Articulate Rise lessons to stop working.
If you delete an Articulate Rise assignment from the Assignments page, the assignment will still appear on the SCORM page, and if you try to open the assignment, you will get an error message. The SCORM file has to be uploaded again to recreate the assignment on the Assignments page. Additionally, if you delete the assignment on the SCORM page, the assignment is also deleted from all applicable locations in the course (including the Assignments page). Contact MBA Research for help restoring a SCORM assignment.
Important Note: Articulate Rise lessons were designed for use in the Learning Center. In order to use the Rise lessons outside of the Learning Center, you will need the SCORM files. Also, the system you intend to transfer the files into will need to have SCORM 1.2 capability. If you are using one of our preloaded courses, the SCORM files are included in the “web_resources” folder of the Canvas Course Export file. If you need SCORM files for individual LAPs, contact us to get a download link (make sure to indicate which LAP files you need). See further details in the instructions linked below. If your desired system cannot display the Rise lessons, you may still access the content using the PDF version of the LAP (referred to as the “Student Handout” or “Student Core Narrative”).
Related Topic:
How do I add due dates and availability dates to an assignment?
When using the Learning Center with students, you may manage course workflow and deadlines by setting due dates and availability dates. The Due date is the date and time when the assignment is due. Assignments submitted after the due date will be marked as late in the Gradebook. Availability dates (also called lock dates) are a specific date range for students to view and submit an assignment. Students cannot view assignment content until after the Available from date has passed. The Until date indicates when students can no longer submit the assignment.
Due dates and availability dates can be set for these assignment types: Assignment, Quiz, and Discussion. The instructions below are for adding dates to an existing assignment. However, you can also add dates when creating an assignment.
ASSIGNMENT: Click the Assignments link, open an assignment, click the Edit button, and scroll to the Assign section. To set a date, click the calendar icon and select the date and time (you may also type the date and time into the date field).
QUIZ: Click the Quizzes link, open a quiz, and click the Edit button. Then under the Details tab, scroll to the Assign section. To set a date, click the calendar icon and select the date and time (you may also type the date and time into the date field).
DISCUSSION: Click the Discussions link, open a discussion, and click the Edit button. Due dates can only be added to graded discussions, but you can add availability dates to graded and ungraded discussions. For ungraded discussions, scroll to the bottom of the page, then to set a date, click the calendar icon and select the date and time (you may also type the date and time into the date field). For graded discussions (under the Options section, the Graded checkbox should be selected), scroll to the Assign section, and to set a date, click the calendar icon and select the date and time (you may also type the date and time into the date field).
Notes:
Related topic:
How do I use the Learning Center Commons?
The Learning Center Commons is the repository where all of the LAPs, preloaded courses, and other resources are stored. It is where you will go to find and import resources into your courses. You may also download resources directly from the Commons for use in another Learning Management System (LMS).
The approved resources feature is enabled in the Learning Center Commons which means that only resources created directly by MBA Research are displayed by default. Approved content is identified by the checkmark icon in the upper left corner of the content card, as well as “MBA Research” as the author on the content card.
Access the Commons: On the main navigation menu, click the Commons link (the Commons icon appears as a C with an arrow pointing to the right).
Find Resources: To search all approved content available to you in Commons, leave the search field and filters blank. In search results, resource details are displayed on content cards. Learn more about content cards here.
To find specific content or narrow your search:
Note:
Import or Download Resources: Find a resource and click the resource title to view the resource details. Click the Import/Download button to download or import the resource.
High School of Business™ (HSB): The HSB resources are stored in a separate area of the Commons accessible only to approved teachers in the High School of Business™ program. To find the HSB resources in the Commons, click the Filter button. Then under Shared With, choose High School of Business and close the filter results box. You may enter keywords or titles into the search field to narrow your search.
Related Topics:
Canvas Guide: Commons Guide – Instructor
If you have any further questions, please contact us at HelpMe@MBAResearch.org.